In this guide I will show you (and guide you through) the process of flashing Libreboot BIOS into your Thinkpad X220!
But first, what is Libreboot and why using it?
Well, as the name imply, Libreboot is a Libre BIOS Firmware (to whoever is not familiar with that, we are again talking about the FOSS principle).
I encourage you to read more about the project as it is very interesting and to educate you on Coreboot as well, since it’s “the original one” and it allowed Libreboot to exist (I won’t go deep into the recent controversies, I’m aware that installing Libreboot on a Thinkpad X220 is virtually the same of installing Coreboot, take this guide for what it is: just a guide).
So, to keep things short, Libreboot is a software that respects our privacy and allows us to get rid of the infamous IME, the Intel Management Engine!
Why is IME a problem?
The Intel Management Engine is a proprietary firmware that is virtually present in any “I series” Intel Processor (i3, i5, i7 etc…) and it’s designed to allow remote access to your machine without you knowing or your approval.
This is dangerous on various level:
- A conspiracy theorist could say that Big Tech is spying on us even at this exact moment (but is this reality really that far?)
- If (or to better say, when) an hacker finds a way to exploit the IME and target you, you would be better to go live in the woods without electricity
The IME is the literal definition of a backdoor and guess what? It is enabled by default and you should not be able to disable it.
Whoever has access to the IME can basically access to all computer information and actions, for an in-depth security review read here.
P.S.
There is an AMD equivalent of the IME, so don’t think you’re safe by just switching to an AMD processor!
Ok, I want to get rid of the IME, what do I need?
First things first, I have to specify that Libreboot (or Coreboot as well) does NOT remove completely the IME from the Thinkpad X220, the reason is fairly technical but you can find the explanation here and here you can find the list of supported hardware.
This is the list of the things I used to flash Libreboot:
- Raspberry Pi 3B+
- Pomona clip 8 PIN (the number of pin varies from computer to computer, check online what you need for you specific model)
- Female to female jumper wire cables (AT LEAST 6, the shorter the better)
- Thinkpad X220 (duh…)
- If you are not planning to ssh into the raspberry you’ll need a monitor and a keyboard to operate on that, since everything is done on the SBC
The setup
Raspberry
Let’s start with the Raspberry; I usually use DietPi for my SBCs, it’s an highly-optimized, light and fast Debian-based distro that works wonderfully in my experience.
The guide is really well done and guide you step by step.
Libreboot
After the OS installation we can start to download the Libreboot stuff:
- Download lbmk (Libreboot make)
git clone https://0xacab.org/libreboot/lbmk.git
- Go into the directory and install the required dependencies
cd lbmk
sudo ./build dependencies debian
Note: if running a different OS, change ‘debian’ in either ‘ubuntu2004’, ‘arch’ or ‘void’, depending on the system you are running
- Download the ROM
curl -LO https://mirrors.mit.edu/libreboot/stable/20230625/roms/libreboot-20230625_x220_8mb.tar.xz
- Inject the “blobs” into the rom (propietary software required to make the computer work)
./vendor inject libreboot-20230625_x220_8mb.tar.xz
- Select the correct ROM
cp grub_x220_8mb_libgfxinit_txtmode_itqwerty.rom /home/admin/.X220/lbmk/libreboot.rom
Renaming for the sike of semplicity and this is the Italian layout
- Verify the blobs, since if they are not inserted correctly and you flash the rom you will brick your computer!
./update trees -b coreboot utils
./cbutils/default/cbfstool -x libreboot.rom
hexdump flashregion_2_intel_me.bin
If the output it’s all 0xFF or it isn’t a bunch of code, the blobs weren’t inserted.
if that’s not the case success! The rom to flash is ready.
The flashing
Now that everything is ready, it’s time to flash the rom:
-
Open the Thinkpad by following this video and UNPLUG THE BATTERY
-
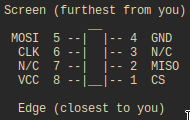
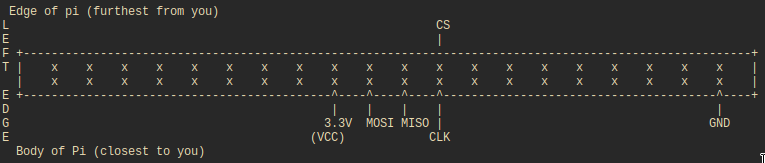
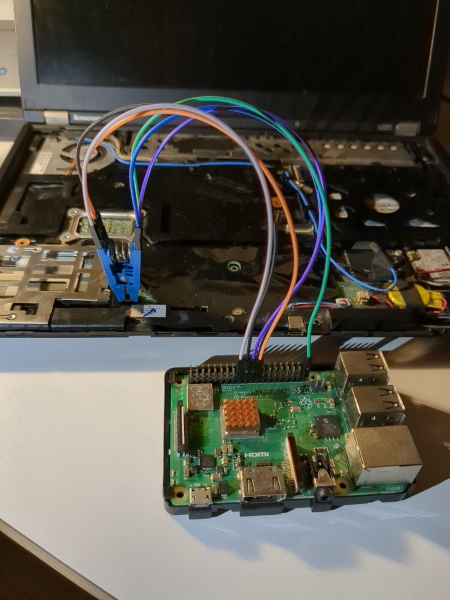
Prepare the flasher by shutting down the Pi and connecting the clip, using the following diagrams as reference (which are great and taken from the blog of Tyler Cipriani)
X220 Bios Chip pinout
Raspberry Pi 3B+ Chip pinout (WARNING: this schema is for this specific model wich have 40 pins instead of 26, if this is not your case check the proper schema for your board)
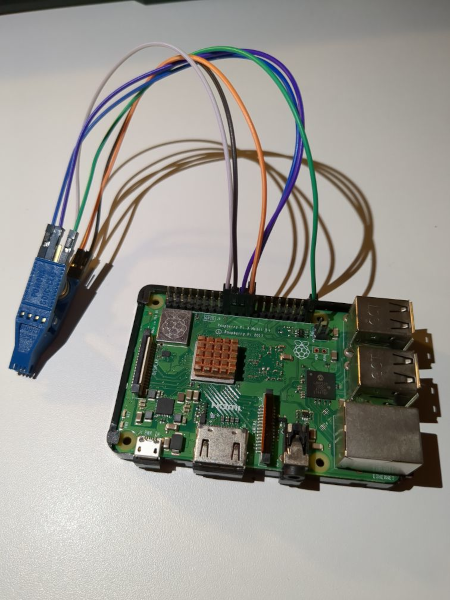
This should be the final result:
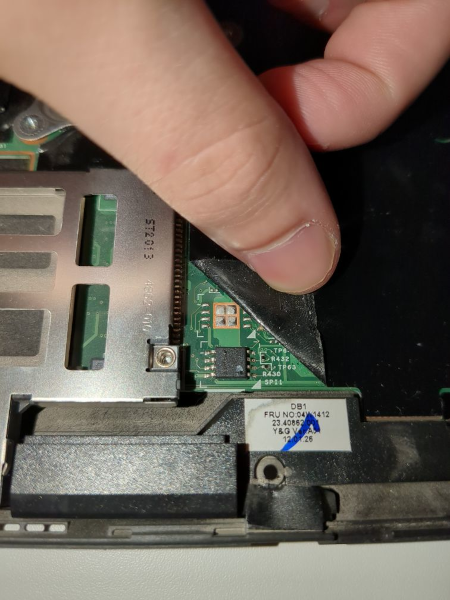
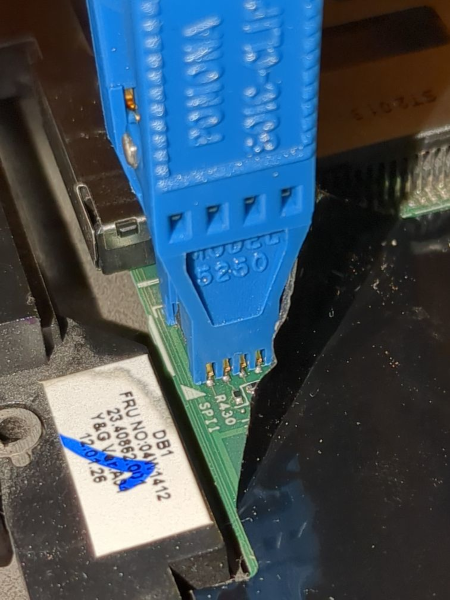
- The chip you have to flash is located on the bottom-left, under the black plastic
Connect the flasher to the chip WHILE EVERYTHING IS POWERED DOWN, both the Raspberry and the thinkpad, there must be NO electricity in both, by doing this you won’t fry your X220 and kill it.
Pay attention to the image: the Pomona clip makes it pretty easy to see if it’s correctly connected, you have to pay attention to the golden spaces in between the blue “teeths” and be sure that they’re alligned with the grey legs of the chip under that
At this point you can power on the raspberry and operate on that:
- First things first enable the GPIO in your raspberry
raspi-config
Go into “Advanced Options” and enable “SPI state”, then exit and install flashrom
dietpi-update
sudo apt-get update && sudo apt-get install libftdi1 libftdi-dev libusb-dev libpci-dev subversion
sudo apt-get install build-essential pciutils usbutils libpci-dev libusb-dev libftdi1 libftdi-dev zlib1g-dev
sudo apt-get install flashrom
At this point do at least (NOT OPTIONAL) two reads from the chip and compare their hash, ONLY if the hash is the same continue with the flashing; if that’s not the case shutdown everything, remove and reattach the clip.
sudo flashrom -p linux_spi:dev=/dev/spidev0.0 -r flash01.bin
sudo flashrom -p linux_spi:dev=/dev/spidev0.0 -r flash02.bin
md5sum flash01.bin flash02.bin<– These two lines MUST be the same
Now flash the rom prepared before!
sudo flashrom -p linux_spi:dev=/dev/spidev0.0 -w lbmk/libreboot.rom
And success! You have successfully flashed the Libreboot BIOS on your computer!
In case anything went wrong and you thinkpad won’t boot, just re-flash flash01.bin (the readings you have done before flashing libreboot, you have done it, right?).
If you need any help or something isn’t clear feel free to contact me!
Technology